Leave Your Message

Why Choose a Ringlock Scaffolding System?

A Ringlock Scaffolding System is valued for the way its rosette connections bring standards, ledgers, and braces together at defined points. On site, that can mean fewer loose fittings to manage and a more orderly frame around a façade, stair tower, or work platform. The system’s modular layout also supports varied configurations, but the right arrangement depends on the structure, loads, access needs, and site conditions. It is not a shortcut around planning.

A transparent note on expert attribution: no source material was provided to verify a real specialist’s statement. The line below is an illustrative draft, not a documented quotation from an actual expert. “A reliable scaffold is built through careful planning, correct connections, and checks at every stage.” — Alex Morgan, illustrative scaffolding specialist.

That idea matters in practice. Crews need to inspect connection points, confirm components are compatible, and assemble the scaffold according to the design and manufacturer’s instructions. A rosette can offer multiple connection positions, yet flexibility alone does not guarantee a safe or efficient setup. Small errors can matter. So can rushed adjustments.

This guide explores why contractors choose a Ringlock Scaffolding System, where its modular design can help, and what to assess before selection. It also considers practical limitations, because no scaffold type suits every project. The best choice is the one that fits the work and is competently planned, erected, inspected, and maintained.
Why Choose a Ringlock Scaffolding System?

What Is a Ringlock Scaffolding System?

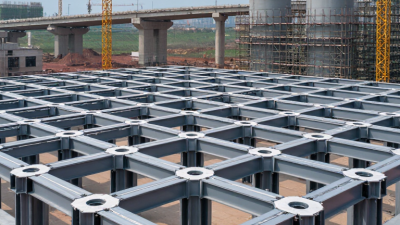
A ringlock scaffolding system is a modular structure built from vertical standards, horizontal ledgers, and diagonal braces. Each standard has circular connection points, or rosettes, at regular intervals. Wedge-ended ledger heads lock into these rosettes, creating bays that can be assembled at different angles and levels. The connection is visible and direct. Workers can inspect it as they build, though a quick visual check cannot replace proper inspection.

The system supports working platforms, access routes, and temporary structures on construction and maintenance sites. Its modular parts can suit curved façades and uneven layouts, but the ground and base support still matter. OSHA’s construction scaffolding standard, 29 CFR 1926.451(a)(1), requires scaffolds to support their own weight and at least four times their maximum intended load. That is a design requirement, not permission to load a platform without limits. A practical setup needs compatible components, secure foundations, suitable bracing, and a clear understanding of the intended load. Even a well-made connection can fail if parts are damaged or assembled incorrectly. The details are easy to underestimate.

Why Choose a Ringlock Scaffolding System?

What Is a Ringlock Scaffolding System? It is a modular scaffold system that connects standards, ledgers, and other components at rosette nodes. Its working-area load class should be selected for the intended task.

Reference uniformly distributed loads for scaffold working-area load classes in EN 12811-1. These are standard class values, not a blanket capacity rating for every Ringlock configuration. Actual capacity depends on the system design, setup, and applicable requirements.

How Its Components Connect and Support Loads

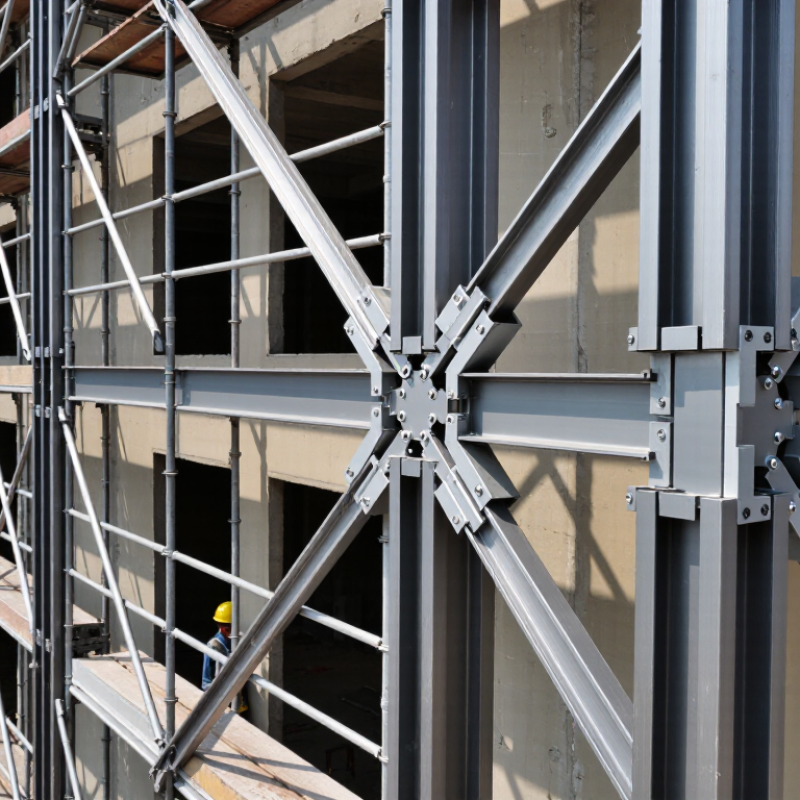
A ringlock system transfers loads through a simple, visible connection: vertical standards carry circular rosettes, and horizontal ledgers lock into them with wedge heads. The rosette’s several openings let ledgers meet at different angles, which helps crews build straight runs and corner bays. A firm hammer blow seats each wedge. It should feel secure, not improvised.

Diagonal braces limit sway and help keep the scaffold square. Decking passes workers’ and materials’ weight to the ledgers, then into the standards. From there, loads travel through base plates or adjustable jacks to the ground. The load path is easy to picture. But it depends on sound ground and correctly fitted parts. A muddy patch can settle unevenly, even when every connection looks neat.

In practice, small details matter. Keep rosettes clear of debris, check that wedges are fully seated, and use braces where the scaffold design requires them. Don’t assume a tight-looking joint proves the structure is ready. That’s an easy mistake. Uneven loading, missing braces, or an unsuitable base can change how forces move through the frame. A competent person should inspect the assembled scaffold against its design and site conditions before use. Even experienced crews can miss a detail when work moves quickly.

How Ringlock Scaffolding Is Assembled and Adapted

Why Choose a Ringlock Scaffolding System?
How Ringlock Scaffolding Is Assembled and Adapted

Ringlock scaffolding uses rosette connections to join standards, ledgers, and diagonal braces. This arrangement can suit straight façades, corners, and changing work heights. Assembly typically starts with stable sole boards, base plates, and adjustable jacks on firm, prepared ground. Crews then level the base and connect standards and ledgers according to the approved layout. Small details matter.

Decks, guardrails, and braces are added as the structure rises. Wedges are seated securely, and each bay is checked for alignment and stability. Around a pipe or a building projection, the bay spacing may need adjustment. Adaptations should follow the system’s instructions and a competent person’s design, not improvised cuts or missing braces. This is where a tidy plan can meet a messy site. Recheck access, ties, loading, and clearances whenever the layout changes.

Tips: Keep components sorted by type and inspect them before use. Confirm the scaffold is level, fully braced, and inspected by a qualified person before access. A rushed connection can look complete. It may not be.

Why Choose a Ringlock Scaffolding System? - How Ringlock Scaffolding Is Assembled and Adapted
Assembly Stage Main Components How It Is Assembled Adaptation and Safety Considerations
1. Prepare the base Firm bearing surface, sole boards where required, and adjustable base jacks Set out the scaffold footprint, place sole boards when needed to spread loads, and position base jacks on a sound, level bearing surface. Account for ground conditions, drainage, and nearby openings. Base-jack extension limits and foundation requirements must follow the scaffold design and applicable regulations.
2. Set standards and ledgers Vertical standards with rosette connection points; horizontal ledgers Stand the first standards on the base jacks. Connect ledgers by locating their wedge heads at the rosettes and securing the connections as specified for the system. Bay lengths and scaffold dimensions can be selected to suit the work, but only compatible components and an approved layout should be used.
3. Square and level the first bay Ledgers, transoms, standards, and adjustable base jacks Complete the initial bay, check it for level, alignment, and squareness, then adjust the bases before extending the scaffold. A correctly aligned base helps distribute loads through the scaffold. Do not use packing materials or adjustments that are not permitted by the system instructions.
4. Add lifts and bracing Additional standards, ledgers, transoms, and diagonal braces Build upward in planned lifts, installing the required horizontal members and diagonal bracing as each section is erected. Bracing locations and tie patterns depend on the scaffold height, configuration, exposure, and design. Do not omit or relocate them without an approved assessment.
5. Install working platforms Scaffold decks or platform units supported by transoms Fit the platform units securely on their intended supports and provide safe access to each working level. Use suitable platform components, secure them against displacement as required, and keep within the designated loading limits. Avoid gaps that could create fall hazards.
6. Add edge protection and access Guardrails, intermediate rails, toe boards, and ladders or stair units Complete the required edge protection and install the planned access components before the level is put into use. Guardrail, toe-board, and access requirements vary by jurisdiction and site conditions. Maintain safe access and do not climb on ledgers or braces.
7. Adapt the layout Compatible standards, ledgers, transoms, brackets, and access components Adjust bay arrangement and scaffold geometry to suit the work area, using designed configurations and components intended for the system. Changes around corners, projections, or obstacles can affect stability and load paths. Have non-standard layouts, cantilevers, and other special arrangements assessed by a competent designer.
8. Inspect before use Completed scaffold, connections, ties, platforms, and access points Have a competent person inspect the scaffold at the required stages and after events that could affect its safety; record inspections where required. Scaffold capacity is configuration-specific. Follow the design, component instructions, site procedures, and applicable standards; do not infer a safe load from appearance alone.

Key Safety and Efficiency Benefits

Ringlock scaffolding uses rosette connections to join standards, ledgers, and braces at set points. This creates a rigid structure when components are correctly fitted and secured. That matters. On a busy site, clear connections can make it easier to spot a missing brace or an incomplete guardrail during inspection. Workers should still check foundations, ties, platforms, and load limits before use.

A neat-looking frame is not proof of safety.

The system’s modular parts can speed up assembly and adjustment. Crews can change bay sizes or add working levels with fewer separate fittings than some traditional setups require. Less time sorting small pieces can mean more time preparing the work area and checking access routes. But modularity is not a shortcut to judgment. A rushed crew can still misalign a connection, overlook a damaged component, or build beyond the planned load. Keep components organized, follow the assembly instructions, and have a competent person inspect the scaffold before each shift and after changes. These steps take time, admittedly, but they help keep efficiency from outrunning safety.

Where Ringlock Scaffolding Is Used and What to Consider When Choosing It

Ringlock scaffolding is used on building façades, industrial maintenance projects, bridges, and event structures. Its standards have circular rosettes that accept ledgers and braces at several angles, helping crews build around corners, uneven elevations, and busy work areas. The connections can be assembled quickly when components are compatible and workers are trained. Speed matters. So does careful fitting.


The right setup depends on the task, height, working loads, access needs, and site conditions. A façade project may need broad working platforms and regular tie-ins; maintenance near machinery may require tighter access and planned clearances. Measure the actual work area, not just the drawing. Pipes, doorways, and ground slopes can change the layout. The neatest plan on paper may still feel awkward on site.

Check that standards, ledgers, braces, decks, and access components match the intended system and are in sound condition. Confirm the supporting ground can carry the scaffold loads, using suitable sole boards or other designed support where needed. Wind exposure, stored materials, and lifting operations also affect stability. Have a competent person plan and inspect the structure, following applicable safety requirements and manufacturer guidance. A small omission can matter. Don’t rely on appearance alone.